
Our Process
See how the Kinitos knee brace and compression sleeve came to be.
The process of researching, designing, building, testing, adapting and finalizing the Kinitos Knee Brace and Compression Sleeve were long tedious tasks that required much decision making, dedication, and drive. So follow our process to see how we reached our final design for the Kinitos products.
Research
Kinitos started with an idea.
As athletes, there is a constant fear of injury, forcing us to stop our sports for weeks to months to recover. One of the worst possible injuries is tearing an ACL, which takes at least 9 months to properly recover from. However, it has become a very common injury as more athletes and everyday people tear their ACL each year. While none of us have tourn an ACL we have all seen how impacts the lives of our friends and family. So we created Kinitos to make the process more comfortable and mobile.
To start we needed to gather information to see what people know about tearing the ACL, ACL reconstruction surgery, and what the recovery process looks like. We polled people who had torn their ACL to understand their experience with the process and to set our goals with the project. We also got in contact with our mentor, Abbey Thomas, an Associate Professor in the Department of Applied Physiology, Health, & Clinical Sciences at UNCC. She taught us about the ACL and provided a professional opinion and advice about our knee brace design

Phase 2 - Poll Infographic
%20(1)-1.png)
Phase 1 - Poll Infographic
Brainstorming
Some things we considered for the knee brace included hooks to hold exercise bands, copper lining to insulate, built-in ice pouches, and adjustable straps for security.


.png)
Annotated Knee Brace Sketch

Knee Brace with Ice Pouches Sketch
Building
& Testing
Kinitos went a lot of testing and a lot of trial an error. From the integrity of the hooks, to their design, to the material of the compression sleeve, we made a lot of changes over the course of the year.
Evolution of the Detachable Hooks

On the left is original hook design with a push a lock mechanism. Our biggest concerns for this iteration were that the tabs for the top part of the locking mechanism would break off or that the lock wouldn't stay secure. Especially after use while recovering from surgery.
So we tried a screw mechanism for the base and the same top. This alleviated our concern for breakage from over use. However, this was more difficult to CAD model because of the limits of the 3D printer and how perfectly it would need to align when screwed in to ensure it looks clean.

At this stage we wanted to ensure the hooks were able to hold the necessary weight. Based on information from our mentor Dr. Abbey Thomas, recoverees likely wouldn't put more than 20 pounds of force on the hooks. Ours held more than 50 so we knew we were on the right track.

After our Phase 2 Presentation Dr. Thomas also recommended we change the shape of the hook. With the new U-hook design patients would be able to pull from any direction without risk of the exercise band falling off. We kept the lock type the same but include four points to hold the hook.

After even more testing we were finally able to achieve a shape and size that would fit on the ACL brace. Using a grill, glue and adhesive, and the advice of Mr. Utley, we securely attached the hooks to the brace with no risk of falling apart.
Our final task was 3D modeling the cap covers for when patience are not completing exercise and don't want to risk the hook catching on anything. We determined these covers would come in a number of designs including balls, faces, and emojis so the patient can customize their brace.

Evolution of the Compression Sleeve
After deciding to design a compression sleeve with built in ice packs we bought a compression sleeve for the knee as a base and to test on (Shown to the right). The original plan was to line it with copper to help maintain the temperature and to install 3 ice pack pouches surrounding the knee. We decided not to include the copper as it would mess with the material since it is stretchy.


From there we tested the material that would hold the ice packs. We settled on the nylon which reached and maintained the necessary temperature for recovery better than spandex. The next step was figuring out where and how to attach the pouches. With the guidance of Mrs. Cosentine and Mrs. Utley, we attached the pouches to stretch with the fabric while still being comfortable.

We elected to include an ice pouch directly below the knee, above the top of the knee and on the below the knee on the front to completely surround the knee in compression and ice. We often referenced Abby's knee to figure out where the icepacks would need to go and how large they would need to be to fit the brace.


Detachable Hook Testing
.jpg)


Detachable Hook Testing Set Up
Testing
Data
A crucial part of our detachable hooks is their durability. We did not need to risk them breaking while patients are completing their exercises. So, to test the strength of our hooks we set up a contraption (seen on the left) to hold the hook to the table so we could tie string to it and use a force gauge to see how much force it could endure after multiple uses. We completed 20 tests at 0°, 30°, 60°, and 90° and found that every angle endure 50+ lbs repetitively. We know that this is more than enough strength because our mentor, Dr. Thomas, told us that patients don't put more than 12 lbs of force on their so for the hooks to handle more than 50 lbs makes their design more than strong enough.

Testing the force the hooks can handle

Breaking the scale
Compression Sleeve Testing
In order to test the compression sleeve we acquired a Pasco Temperature Probe. As explained by our mentor, Mrs. Cosentine (On the left), we place the probe between the skin and whatever material we are testing to monitor the temperature. The goal was to make sure the knee stays within the temperature recovery range of 10°C and 14°C. We tested 2 materials, Nylon and Spandex, and after our testing we found that the Nylon kept cold long past the 15 minute mark suggested by doctors. On the other hand, the spandex got too warm after about 10 minutes. As a result, we decided to use the nylon for our compression sleeve. Below are pictures of our testing set up and a video of the test taking place.

Compression Sleeve Testing Set Up


Compression Sleeve Testing

Compression Sleeve Testing Results
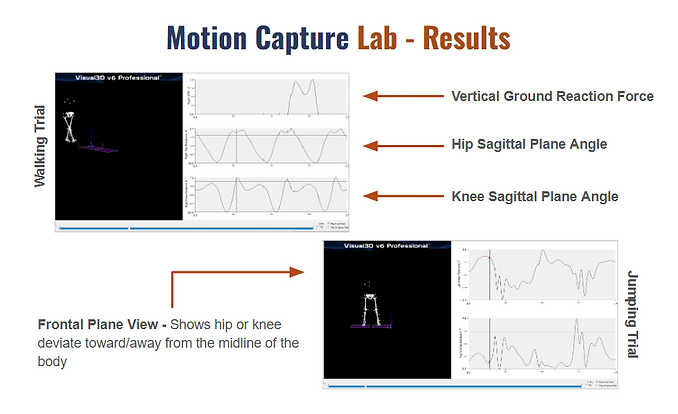
Motion Capture Lab
With the help of our mentor, Dr. Thomas, we gained access to the Motion Capture Lab in the bottom of Belk Gymnasium. Here we were able to see how the lab works and how it used. Dr. Thomas explained how they often use it on athletes to track their movement. That data is the sent through a program and in return they recieve information on where the individual is putting force on their body. This information can then be used to determine how they might injure themselves and allow the athlete and their trainers to create exercise to strengthen their bodies.
Compression Sleeve Testing Set Up

Caption Motion Lab

Caption Motion Lab

Dr. Thomas explaining the set up

Addison walking split screen with movement on computer

Caption Motion Lab

Addison set up

Addison walking

Addison moving on the screen
The Final Product

To the left and below we have our final carbon fiber, detachable hook designs with our imbedded logo. Four of these hooks were then attached to the knee brace, creating a working final product.
In reality, if we had more time to work on this, we would have designed a printed a whole new brace with the hooks built into the base. On the right you can see it attached to the brace.


.jpg)
We also designed and printed cap covers that would be customizable for the patient. These covers prevent anything from catching on the brace when the hooks aren't in use.
With a variety of designs and colors patience would be able to add touch of their own personality to the brace, making it more appealing to wear.

Our final compression sleeve was built with comfort and durability in mind. Using an already made compression sleeve, we carefully sewed the nylon pouches to the inside of the sleeve. It was a precarious process because of the nature of the sleeve. We needed to sew the material while it was stretched out since the nylon isn't as flexible. However, with much trial and error we nailed the process and as a result have a function ice pouch compression sleeve.